ISO 20344 Full List Testing Equipment - Unuo Instruments Personal Protective Equipment — Test Methods…
Outsole Flexing Test Guide: Bennewart Method, Standards & Failure Analysis
Technical Analysis of the Outsole Flexing Test: Methods, Standards, and Failure Prevention
The Outsole Flexing Test is a critical quality control benchmark in modern footwear manufacturing. Whether you are developing flexible casual shoes or heavy-duty safety boots, evaluating how an outsole withstands repeated bending prevents costly mass-production defects and customer returns.
This technical guide covers everything you need to know about outsole flex resistance—from failure modes and international standards (SATRA TM161, ISO 17707) to step-by-step testing procedures, equipment selection, and troubleshooting solutions.
1. Common Outsole Flexing Failure Modes
During repeated bending, outsoles can fail in several distinct ways depending on their material composition and structural design. Visual and structural failures are categorized into:
- Cracking: Spontaneous surface fractures in high-stress zones.
- Cut Growth: The expansion of a pre-existing nick or chisel cut.
- Delamination: Separation between multi-layered sole components.
- Debonding: Adhesive failure at the sole-to-upper or sole-to-midsole interface.
- Permanent Deformation: Loss of original shape or permanent creasing.
- Tread/Granule Shedding: Detachment of surface patterns or crumbling of foam particles.
2. Why Conduct an Outsole Flexing Test?
2.1 R&D and Prototyping Stage
Laboratories use flexing test data to pinpoint structural, material, or molding flaws early. By testing small pilot batches, manufacturers can modify mold designs or material formulas before scaling up, drastically saving on raw materials, labor, and lead times.
2.2 Mass Production Quality Control
Ongoing batch testing monitors production stability, catching defects caused by inconsistent operator handling or processing fluctuations before finished shoes reach the market.
2.3 Material & Compliance Validation
- Target Materials: This test is essential for flexible outsoles with surface coatings, painted designs, or molded patterns, as well as foamed or injection-molded compounds like TPR, EVA, PVC, and supercritical foams(to check for inter-particle cracking).
- Global Export Compliance: Major retail brands (such as Next in the UK) and EU safety footwear regulations mandate outsole flex resistance testing for supplier onboarding.
| Engineering Note on Accelerated Testing:
Laboratory sole flexing is an accelerated fatigue test. While it correlates with real-world wear at a specific acceleration ratio, results should be used for comparative quality evaluation rather than an exact prediction of a shoe’s lifespan. |
3. Testing Standards and Core Principles
3.1 Applicable International Standards
- SATRA TM161 (Bennewart flex test)
- ISO 17707:2005 / EN ISO 17707:2005 / GOST ISO 17707-2015
- EN ISO 20344:2024 (Clause 8.6)
- GB/T 20991-2024 (Clause 8.6)
- QB/T 2885-2007
- DIN 53543 (Clause 6.3)
3.2 Testing Principle
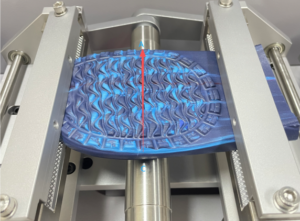
A prepared outsole is clamped at both ends with a pre-cut chisel mark positioned directly over a flexing mandrel. The machine repeatedly bends the sole to a 90° angle. Technicians then measure the material’s resistance to cut growth and observe whether surface patterns trigger new cracks. This method is specifically designed for flexible footwear outsoles.
4. Testing Equipment & Calibration Requirements
The UI-FT26 Outsole Flexing Tester (Bennewart Type) is engineered to meet all international flexing standards, offering low-noise operation, minimal vibration, and high mechanical precision.
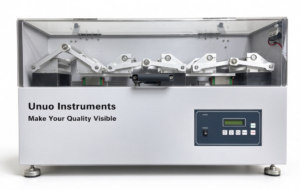
4.1 Technical Specifications (UI-FT26)
| Parameter | Specification |
| Clamp Spacing & Width | Spacing: 110 ± 1 mm | Width: 131 mm |
| Flexing Mandrel Diameter | 30 ± 0.1 mm |
| Movable Clamp Stroke | 41.5 ± 0.5 mm |
| Flexing Speed | 135~ 150 cycles/min |
| Flexing Angle | 90° ± 2° |
| Counter | Programmable LCD (0 ~ 99,999,999 cycles) |
| Dimensions (Approx.) | 100 cm × 40 cm × 55 cm |
| Weight (Approx.) | 68 kg |
| Power Supply | 1Φ AC 220V 3A (or customized by region) |
4.2 Calibration & Maintenance
To maintain data accuracy, Bennewart testers require annual (12-month) calibration covering the flexing angle (90° ± 2°), mandrel diameter, clamp distance, stroke displacement, and counter accuracy. Additionally, inspect the 2mm piercing chisel every time it is replaced—a dull blade creates irregular incisions that skew test results.
5. Step-by-Step Outsole Flexing Test Procedure
5.1 Auxiliary Equipment & Materials
- Shoe Stiffness Tester
- 2mm standard piercing chisel & utility knife
- Magnifying glass with a built-in scale (0.1 mm precision)
- Standard conditioning chamber & aging chambers (hydrolysis/humidity chamber, low-temperature freezer)
- Specimens: A set of 3 finished shoes or outsoles.
5.2 Mandatory Pre-Test Stiffness Screening
Before running a Bennewart test, specimens must pass a stiffness check: the force required to bend the sole to 45° must be ≤ 30 N (or at a 30 N load, the bend angle must be ≥ 45°).
| What if the sole exceeds 30N? (Alternative Testing Methods)
Rigid soles cannot achieve a true 90° bend on a Bennewart tester; instead, stress concentrates at the clamps and distorts the data. For soles > 30 N, we recommend switching to a Ross Flex Tester [Link to Ross Flex Tester Page] (using sheet samples) or a Belt Flex Tester [Link to Belt Flex Tester Page] to accurately evaluate material durability. |
5.3 Specimen Preparation
Select 3 parallel specimens. (Note: If any specimen experiences clamp slippage, breakage at the clamp, or an off-center cut during testing, discard that data and test a replacement sample.)
5.3.1 Trimming: Use a utility knife to remove the upper from finished shoes, or trim away sole sidewalls extending above the insole level. 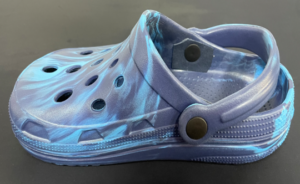
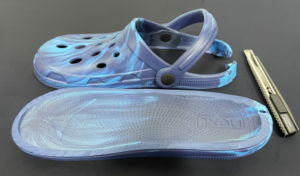
5.3.2 Marking Axes: Locate the extreme toe point (X) and heel point (Y) and connect them to form the longitudinal XY axis. Draw a perpendicular line (AC) across the flexing zone (roughly one-third from the toe). Choose a shallow tread area near the XY/AC intersection for the incision.
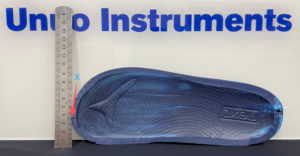
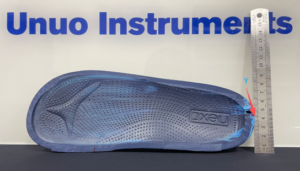
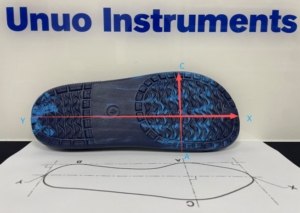
- Conditioning: Condition the prepared soles in a standard environment (23 ± 2 °C, 50 ± 5% RH) for 24 hours.
5.4 Specimen Mounting & Incision
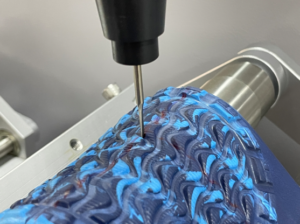
Place the sole insole-side down, aligning the AC line directly parallel to the flexing mandrel. Secure both clamps tightly and trim off any excess heel material protruding past the rear clamp. Using the 2mm chisel, pierce a clean cut at the shallow tread intersection of the XY and AC lines.
5.5 Running the Test & Evaluating Results
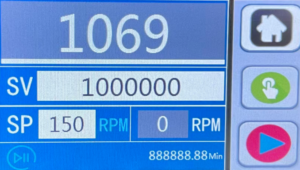
- Machine Settings: Set the flexing speed to 135 ~ 150 cycles/min. Standard durability requires 30,000 cycles, while high-end footwear brands typically require 50,000 cycles.
- Inspection at Maximum Flex: Use the machine’s ‘jog/inching’ mode to stop the mandrel at the full 90° bent position. Using the 0.1 mm scale magnifier, measure and record the final length of the initial cut, plus the count and length of any new cracks across all 3 specimens.
- Secondary Visual Checks: For R&D and mass production, technicians must also document:
- Stress whitening, permanent creasing, or collapsed/softened sole edges.
- Bubbling or delamination between composite layers.
- Blooming (white powder), oil exudation, or surface chalking.
- Gloss changes from friction (critical for dress shoes and light-colored soles).
- Embrittlement or crumbling when rubbed (common in hydrolyzed PU or high-recycled-content soles).
5.6 Environmental Pre-Treatment (Critical for PU Soles)
Many footwear brands require environmental aging prior to flexing to simulate storage and climate degradation:
- Hydrolysis / Heat-Humidity Aging: Typically 50 °C at 95% RH for 7 days, followed by 24 hours of standard conditioning before flexing. (Unaged test results cannot validate a PU sole’s resistance to hydrolysis.)
- Low-Temperature Flexing: For cold-climate footwear, flexing is performed inside a refrigerated chamber to evaluate cold-cracking resistance. (Unuo Instruments offers custom Low-Temperature Flexing Testers for extreme-cold testing.)
5.7 Key Sources of Testing Error
- Preparation Errors: Dull chisels causing uneven cut depths, off-axis incisions, or accidental nicks along the sole edge when cutting away the upper.
- Equipment Factors: Angle drift, worn mandrels, clamp slippage, or frictional heat buildup at 135–150 cycles/min (which softens rubber and PU, altering cut-growth rates).
- Environmental Fluctuations: Temperature/humidity deviations affecting the modulus of foamed soles.
- Observation Delays: Failing to use a 0.1 mm magnifier or measuring immediately upon stopping—some micro-cracks experience delayed propagation after the sole rests.
6. Bennewart vs. Ross vs. Belt Flexing Tests: Which Equipment Do You Need?
Choosing the right footwear testing equipment depends on whether you are testing a raw material compound or a finished shoe structure. Compare the three primary methods below:
| Feature | Bennewart Flex Test | Ross Flex Test | Belt Flex Test |
| Recommended Equipment | UI-FT26 Bennewart Tester | UI-FT27 Ross Flex Tester | UI-FT36 Belt Flex Tester |
| Primary Application | Finished outsoles & safety boots (structure + material) | Raw material R&D & QC (pure compound cut growth) | Rigid or thick outsoles unsuitable for Bennewart |
| Specimen Type | Complete outsole (retains tread & layers; higher sample cost) | Molded rubber/polymer sheet strips (isolates material) | Outsole bonded onto a continuous canvas belt |
| Flexing Speed | 135 ~ 150 cycles/min (notable heat buildup) | 60 cycles/min (minimal heat buildup) | Continuous rolling around selectable rollers |
| Flexing Angle | 90° | 90° | Conforms to roller curvature |
| Mandrel Diameter | 30 mm | 10 mm | Varies by standard & sample thickness |
| Initial Cut | 2 mm chisel cut | 2 mm chisel cut | Standard or un-cut depending on protocol |
| Standard Cycles | 30,000 or 50,000 cycles | 150,000 cycles | Standard-dependent |
| Result Reporting | Cut growth length (mm) & new crack count | Cut growth rate (mm/kC) | Visual inspection for cracking/delamination |
7. Limitations of the Bennewart Flexing Method
While the Bennewart method is the industry standard for flexible outsoles, engineers should keep three limitations in mind:
- Simplified Biomechanics: Human walking combines bending, compression, torsion, and abrasion simultaneously. The Bennewart tester only simulates reciprocating bending.
- Thermal Effects: High-speed cycling generates internal friction heat, which can temporarily alter the mechanical properties of thermoplastics and elastomers.
- Single-Factor Stress: The standard test does not account for UV exposure, oils, or chemical degradation unless paired with pre-aging protocols.
- Troubleshooting: How to Fix Outsole Flexing Failures
If your outsoles fail during laboratory testing, apply these targeted engineering adjustments:
- Excessive Cut Growth: Reformulate the rubber or polymer compound to improve tear strength and cut-growth resistance.
- New Cracks in the Flex Zone: Reposition the anatomical flex grooves, reduce sole thickness in the bending area, and eliminate sharp mold corners or gate marks that act as stress concentrators.
- Delamination & Bubbling: Improve primer/adhesive compatibility between layers and optimize molding temperatures and pressures.
- Stress Whitening & Permanent Creases: Increase elastomer resilience (rebound) and adjust compound hardness.
- Blooming or Stickiness on PU Soles: Upgrade to hydrolysis-resistant polyols/isocyanates, control plasticizer migration, and mandate 7-day humidity aging before batch approval.
References
- GB/T 20991-2024: Personal protective equipment — Test methods for footwear
- ISO 17707:2005: Footwear — Test methods for outsoles — Flex resistance
- SATRA TM161: Bennewart flex test — resistance to cut growth on flexing
- SATRA TM60: Ross flex test
| Looking to Upgrade Your Footwear Testing Lab?
Ensure full compliance with ISO 17707 and SATRA TM161 using the UI-FT26 Bennewart Outsole Flexing Tester . Need custom low-temperature flexing chambers or Ross flex testers? Contact the Unuo Instruments Engineering Team today for tailored Footwear Testing Solutions. |
Related Posts